In the previous post I described Google's Lens Blur
feature and how we can use code to extract the depth map stored in the PNG image output by Lens Blur. Lens Blur performs a series of image frame captures, calculates the depth of each pixel (based on a user-configurable focus locus) and produces a new image having a bokeh effect. In other words, the scene background, is blurred. Lens Blur stores the new (bokeh) image, the original image, and the depth-map in a single PNG file.
In this blog post we'll pick up where we left off last time,
right after we extracted the original image and the depth map from the Lens Blur's PNG output file and stored them each in a separate PNG file. This time
we'll go in the reverse direction: that is, starting with the original image and
the depth map we'll create a depth blurred image - an image with the bokeh effect. I'm going to show that
with very little sophistication we can achieve some pretty good results in
replicating the output of Lens Blur. This is all going to be kinda crude, but I think
the RoI (return-on-investment) is quite satisfactory.
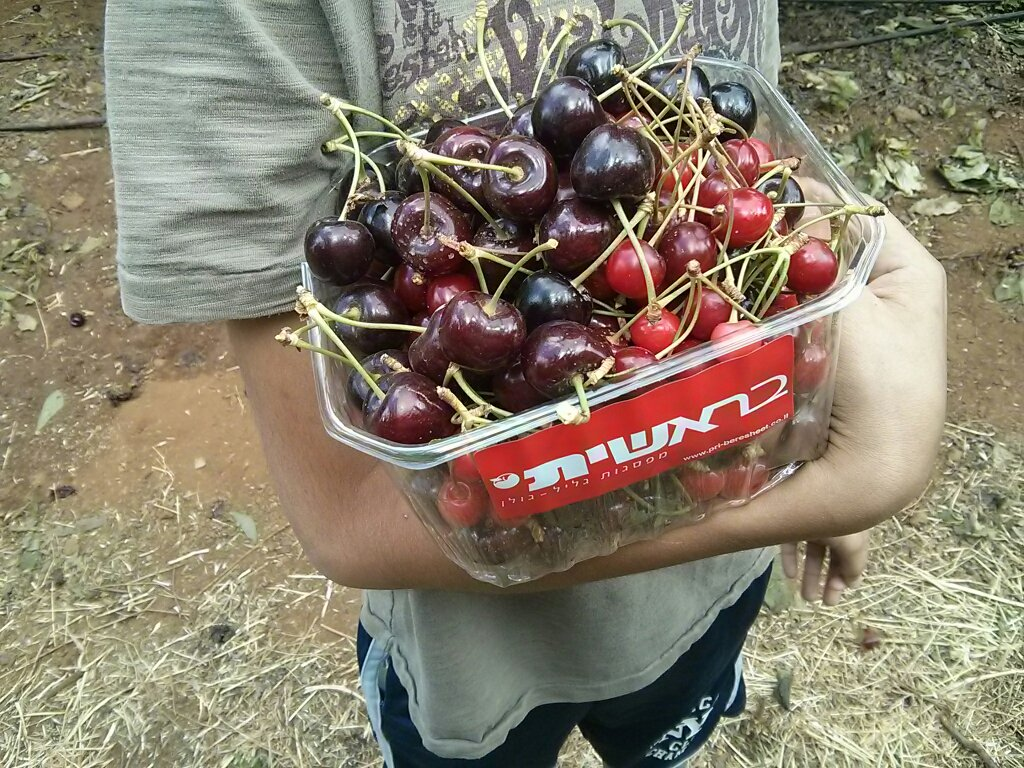 |
| The original image as extracted to a PNG file |
My simpleton's approach for depth blurring is this: I start by finding the mean value of the depth map. As you probably recall, the grey values in the depth map correspond to the depth values calculated by Lens Blur. The mean depth value will serve as a threshold value - every pixel above the threshold will be blurred while all other pixels will be left untouched. This sounds rather crude, not to say dirty, but it works surprisingly well. At the outset I thought I would need to use several threshold values, each with a differently sized blurring kernel. Larger blurring kernels use more neighboring pixels and therefore increase the blurring effect. But alas, a simple Boolean threshold filter works good enough.
 |
| The depth map as calculated by Lens Blur after extraction and storage as a PNG file. The grey value of every pixel in this image corresponds to the depth of the pixel in the original image. Darker pixels are closer to the camera and have a smaller value. |
The diagram below shows the Boolean threshold filter in
action: we traverse all pixels in the original image an every pixel above the
threshold is zeroed (black).
 |
| The result of thresholding the original image using the mean value of the depth-map. |
You can see that the results are not too shabby. Cool, right?
I think it is interesting to ask if it is legitimate to expect this thresholding technique to work for every Lens Blur depth-map? And what's the optimal threshold, I mean why not threshold using the median? or mean-C? or some other calculated value?
Let's get back to the image above: along the edges of the t-shirt and arm there is (as expected) a sharp gradient in the depth value. Of course, this is due to Google's depth extraction algorithm which performs a non-gradual separation between foreground and background. If we looked at the depth-map as a 3D terrain map, we should see a large and fast rising "mountain" where the foreground objects are (arm, cherry box). We expect this "raised" group of pixels to be a closed and connected convex pixel set. That is, we don't expect multiple "mountains" or sprinkles of "tall" pixels. Another way to look at the depth-map is through the histogram. Unlike intensity histograms , which tell the story of the image illumination, the data in our histogram conveys depth information.

The x-axis of the histogram depicted here (produced by IrfanView) is a value between 0-255 and corresponds to the height value assigned by Lens Blur (after normalizing to the 8-bit sample size space). The y-axis indicates the number of pixels in the image which have the corresponding x values. The red line is the threshold; here I located it at x=172 which is the mean value in the depth-map. All pixels above the threshold (i.e. to the right of the red line) are background pixels and all pixels below the threshold are foreground. This histogram looks like a classic bimodal histogram with two modes of distribution; one corresponding to the foreground pixels and the other corresponding to the background pixels. Under the assumptions I laid above on how the Lens Blur depth algorithm works, this bimodal histogram is what we should expect.
It is now clear how the thresholding technique separates these two groups of pixels and how the choice of threshold value affects the results. Obviously the threshold value needs to be somewhere between the foreground and the background modes. Exactly where? Now that's a bit tougher. In his book on image processing, Alan Bovik suggests applying probability theory to determine the optimal threshold (see pages 73-74). Under our assumption of only two modes (background and foreground), and if we assume binomial probability density functions for the two modes, then Bovik's method is likely to work. But I think the gain is small for the purpose of this proof-of-concept. If you download the source code you can play around with different values for the threshold.
It is now clear how the thresholding technique separates these two groups of pixels and how the choice of threshold value affects the results. Obviously the threshold value needs to be somewhere between the foreground and the background modes. Exactly where? Now that's a bit tougher. In his book on image processing, Alan Bovik suggests applying probability theory to determine the optimal threshold (see pages 73-74). Under our assumption of only two modes (background and foreground), and if we assume binomial probability density functions for the two modes, then Bovik's method is likely to work. But I think the gain is small for the purpose of this proof-of-concept. If you download the source code you can play around with different values for the threshold.
The next step is not much more complicated. Instead of
zeroing (blackening) pixels above the threshold, we use some kind of blurring (smoothing) algorithm, as in image denoising. The general idea is to use each input pixel's neighboring pixels in order to calculate the value of the corresponding output pixel. That is, we use convolution to apply a low-pass filter on the pixels which pass the threshold test condition.
As you can see in the code, I've used several different smooothing kernels (mean, median, gausian) with several different sizes. There are a few details that are worth mentioning.
The convolution filter uses pixels from the surrounding environment of the input pixel, and sometimes we don't have such pixels available. Let's take for example the first pixel, at the upper left corner (x,y) = (0,0) and a box kernel of size 5x5. Clearly we are missing the 2 upper rows (y=-1, y=-2) and 2 left columns (x=-1, x=-2). There are several strategies to deal with this such duplicating rows and columns or using a fixed value to replace the missing data. Another strategy is to create an output image that is smaller than the input image. For example, using the 5x5 kernel, we would ignore the first and last two rows and first and last two columns and produce an output image that is 4 columns and 4 rows smaller than the input frame. You can also change the filter kernel such that instead of using the center of the kernel as the pixel we convolve around, we can use one of the corners. This doesn't bring us out of the woods, but it lets us "preserve" two of the sides of the image. And you can do what I did in the code, which is literally "cutting some corners": for all pixels in rows and columns that fall outside of a full kernel, I simply leave them untouched. You can really see this when using larger kernels - the frame is sharp and the internal part of the image is blurry. Ouch - I wouldn't use that in "real" life ;-)
Next, there's the issue of the kernel size. As mentioned above, larger kernel sizes achieve more blurring, but the transition between blurred pixels and non-blurred pixels (along the depth threshold contour lines) is more noticeable. One possible solution is to use a reasonably sized kernel and perform the smoothing pass more than once. If your filter is non-linear (e.g. Gaussian) then the result might be a bit hairy.
In the output of Google's Lens Blur you can also easily detect artifacts along the depth threshold contour lines, but because they change the "strength" of the blurring as a function of the pixel depth (instead of a binary threshold condition as in my implementation) they can achieve a smoother transition at the edges of the foreground object.
 |
| Application of a filter on the input image to generate the output image. |
As you can see in the code, I've used several different smooothing kernels (mean, median, gausian) with several different sizes. There are a few details that are worth mentioning.
The convolution filter uses pixels from the surrounding environment of the input pixel, and sometimes we don't have such pixels available. Let's take for example the first pixel, at the upper left corner (x,y) = (0,0) and a box kernel of size 5x5. Clearly we are missing the 2 upper rows (y=-1, y=-2) and 2 left columns (x=-1, x=-2). There are several strategies to deal with this such duplicating rows and columns or using a fixed value to replace the missing data. Another strategy is to create an output image that is smaller than the input image. For example, using the 5x5 kernel, we would ignore the first and last two rows and first and last two columns and produce an output image that is 4 columns and 4 rows smaller than the input frame. You can also change the filter kernel such that instead of using the center of the kernel as the pixel we convolve around, we can use one of the corners. This doesn't bring us out of the woods, but it lets us "preserve" two of the sides of the image. And you can do what I did in the code, which is literally "cutting some corners": for all pixels in rows and columns that fall outside of a full kernel, I simply leave them untouched. You can really see this when using larger kernels - the frame is sharp and the internal part of the image is blurry. Ouch - I wouldn't use that in "real" life ;-)
Next, there's the issue of the kernel size. As mentioned above, larger kernel sizes achieve more blurring, but the transition between blurred pixels and non-blurred pixels (along the depth threshold contour lines) is more noticeable. One possible solution is to use a reasonably sized kernel and perform the smoothing pass more than once. If your filter is non-linear (e.g. Gaussian) then the result might be a bit hairy.
In the output of Google's Lens Blur you can also easily detect artifacts along the depth threshold contour lines, but because they change the "strength" of the blurring as a function of the pixel depth (instead of a binary threshold condition as in my implementation) they can achieve a smoother transition at the edges of the foreground object.
 |
| Gaussian smoothing with kernel size 9x9 |
 |
| Mean.filter with 7x7 kernel size., 2 passes |
| Mean.filter with 11x11 kernel size., 1 pass |
 |
| Mean.filter with 15x15 kernel size., 1 pass |
/*
* The implementation is naive and non-optimized to make this code easier to read
* To use this code you need to download LodePNG(lodepng.h and lodepng.cpp) from
* http://lodev.org/lodepng/.
* Thanks goes to Lode Vandevenne for a great PNG utility!
*
*/
#include "stdafx.h"
#include "lodepng.h"
#include
#include
#include
#include
#include
struct image_t {
image_t() : width(0), height(0), channels(0), buf(0) {}
image_t(size_t w, size_t h, size_t c, uint8_t *buf ) :
width(w), height(h), channels(c), buf(buf) {}
size_t width;
size_t height;
size_t channels;
uint8_t *buf;
};
struct box_t {
box_t(size_t w, size_t h) : w(w), h(h) {}
size_t w;
size_t h;
};
struct image_stats {
image_stats() : mean(0) {
memset(histogram, 0, sizeof(histogram));
}
size_t histogram[256];
size_t mean;
};
void calc_stats(image_t img, image_stats &stats) {
uint64_t sum = 0; // 64 bit sum to prevent overflow
// assume the image is grayscale and calc the stats for only the first channel
for (size_t row=0; row![]() v;
for (size_t y=row-size.h/2; y<=row+size.h/2; y++) {
for (size_t x=col-size.w/2; x<=col+size.w/2; x++) {
v.push_back(
v;
for (size_t y=row-size.h/2; y<=row+size.h/2; y++) {
for (size_t x=col-size.w/2; x<=col+size.w/2; x++) {
v.push_back(
                   input.buf[y*input.width*input.channels + x*input.channels + color]);
            }
        }
        std::nth_element( v.begin(), v.begin()+(v.size()/2),v.end() );
        return v[v.size()/2];
    }
};


class Gaussian_9x9 : public Filter {
public:
    Gaussian_9x9(const image_t &input, const image_t &output) :
        Filter(input, output, box_t(9,9)) {}
private:
    size_t convolve(size_t row, size_t col, size_t color) const {
        static const
        uint8_t kernel[9][9] = {{0, 0, 1,  1,  1,  1, 1, 0, 0},
                                {0, 1, 2,  3,  3,  3, 2, 1, 0},
                                {1, 2, 3,  6,  7,  6, 3, 2, 1},
                                {1, 3, 6,  9, 11,  9, 6, 3, 1},
                                {1, 3, 7, 11, 12, 11, 7, 3, 1},
                                {1, 3, 6,  9, 11,  9, 6, 3, 1},
                                {1, 2, 3,  6,  7,  6, 3, 2, 1},
                                {0, 1, 2,  3,  3,  3, 2, 1, 0},
                                {0, 0, 1,  1,  1,  1, 1, 0, 0}};
        static const size_t kernel_sum = 256;
        size_t total = 0;
        for (size_t y=row-size.h/2; y<=row+size.h/2; y++) {
            for (size_t x=col-size.w/2; x<=col+size.w/2; x++) {
                total += input.buf[y*input.width*input.channels + x*input.channels +
                                   color] *
                         kernel[y-row+size.h/2][x-col+size.w/2];
            }
        }
         return total/kernel_sum;
    }
};

class Gaussian_5x5 : public Filter {
public:
    Gaussian_5x5(const image_t &input, const image_t &output) :
        Filter(input, output, box_t(5,5)) {}
protected:
    size_t convolve(size_t row, size_t col, size_t color) const {
        static const
        uint8_t kernel[5][5] = {{ 1,  4,  7,  4,  1},
                                { 4, 16, 26, 16,  4},
                                { 7, 26, 41, 26,  7},
                                { 4, 16, 26, 16,  4},
                                { 1,  4,  7,  4,  1}};
        static const size_t kernel_sum = 273;
        size_t total = 0;
        for (size_t y=row-size.h/2; y<=row+size.h/2; y++) {
            for (size_t x=col-size.w/2; x<=col+size.w/2; x++) {
                // convolve
                total += input.buf[y*input.width*input.channels + x*input.channels +
                                   color] *
                          kernel[y-row+size.h/2][x-col+size.w/2];
            }
        }
        return total/kernel_sum;
    }
};

void blur_image(const image_t &input_img, const image_t &output_img,
                const image_t &depth_img, const BlurConfig &cfg) {
  size_t width = input_img.width;
  size_t height = input_img.height;
  size_t channels = input_img.channels;

  for (size_t pass=cfg.num_passes; pass>0; pass--) {
      for (size_t row=0; row cfg.threshold) {
                    size_t new_pixel = cfg.filter.execute(row, col, color);
                    output_img.buf[row*width*channels+col*channels+color] = new_pixel;
                } else {
                    output_img.buf[row*width*channels + col*channels + color] =
                        input_img.buf[row*width*channels + col*channels + color];
                }
            }
        }
      }
// going for another pass: the input for the next pass will be the output
      // of this pass
      if ( pass > 1 )
        memcpy(input_img.buf, output_img.buf, height*width*channels);
  }
 }

void do_blur() {
    const std::string wdir("");
    const std::string inimage(wdir + "gimage_image.png");
    const std::string outimage(wdir + "gimage_image.blur.png");
    const std::string depthfile(wdir + "gimage_depth.png");

    image_t depth_img;
    depth_img.channels = 3;
    unsigned error = lodepng_decode24_file(&depth_img.buf, &depth_img.width,
                                           &depth_img.height, depthfile.c_str());
    if(error) {
        printf("[%s] decoder error %u: %s\n", depthfile.c_str(), error,
                lodepng_error_text(error));
        return;
    }

    image_t input_img;
    input_img.channels = 3;
    error = lodepng_decode24_file(&input_img.buf, &input_img.width,
                                  &input_img.height, inimage.c_str());
    if(error) {
        printf("[%s] decoder error %u: %s\n", depthfile.c_str(), error,
                lodepng_error_text(error));
        return;
    }

    image_t output_img(input_img.width,
                       input_img.height,
                       input_img.channels,
                       (uint8_t *)
malloc(input_img.width*input_img.height*input_img.channels));
    image_stats depth_stats;
    calc_stats(depth_img, depth_stats);
    // Choose one of these filters or add your own
    // Set the filter connfiguration: filter algo and size, number of passes, threshold
    BlurConfig cfg(MeanBlur(input_img, output_img, box_t(7,7)), 3, depth_stats.mean);
    /*
    BlurConfig cfg(MeanBlur(input_img, output_img, box_t(11,11)), 2, depth_stats.mean);
    BlurConfig cfg(MedianBlur(input_img, output_img, box_t(7,7)), 1, depth_stats.mean);
    BlurConfig cfg(Constant(input_img, output_img), 1, depth_stats.mean);
    BlurConfig cfg(Gaussian_9x9(input_img, output_img), 1, depth_stats.mean);
    BlurConfig cfg(Gaussian_5x5(input_img, output_img), 5, depth_stats.mean);
    */

    blur_image(input_img, output_img, depth_img, cfg);

    error = lodepng_encode24_file(outimage.c_str(), output_img.buf,
                                  output_img.width, output_img.height);
    if (error)
        printf("[%s] encoder error %u: %s\n", outimage.c_str(), error,
                lodepng_error_text(error));

    free(depth_img.buf);
    free(input_img.buf);
    free(output_img.buf);
}

int main(int argc, char* argv[])
{
    do_blur();
    return 0;
}