If I came upon the BitTube class outside of the Android context, it would have been quite unremarkable and forgetful. The BitTube implementation is pretty obvious and straight-forward: it is a "parcel-able" wrapper to a pair of sockets. A socketpair to be exact. And that's the eyebrow-raising tidbit: a socketpair is a Linux/Unix IPC (inter-process communication) mechanism very similar to a pipe. What is a Linux IPC doing at the heart of AOSP when Binder is used almost everywhere else (another outlier is the RIL to rild - radio interface daemon - socket IPC)?
A socketpair sets up a two-way communication pipe with a socket attached to each end. With file descriptor duplication (dup/dup2), you can pass the socket handle to another process, duplicate it and start communicating. BitTube uses Unix sockets with sequenced packets (SOCK_SEQPACKET) which, like datagrams, only deliver whole records, and like SOCK_STREAM, are connection-oriented and guarantee in-order delivery. Although socketpair is a two-way communication pipe, BitTube uses it as a one-way pipe and assigns one end of the pipe to a writer and another to a reader (more on that later on). The send and receive buffers are set to a default limit of 4KB each. There's an interface for writing and reading a sequence of same-size "objects" (sendObjects, recvObjects).
A short look around AOSP reveals that BitTube is used by the Display subsystem and by the Sensors subsystem, so let's look at how it is used the Sensors subsystem. I'll provide a very brief recap of the Sensors Java API to level-set, in case you are not familiar with this.
An application uses the SensorManager system service to access (virtual and physical) device sensors. It registers to receive sensor events via two callbacks, which report an accuracy change or the availability of a sensor reading sample (event).
public class SensorActivity extends Activity, implements SensorEventListener {
private final SensorManager mSensorManager;
private final Sensor mAccelerometer;
public SensorActivity() {
mSensorManager = (SensorManager)getSystemService(SENSOR_SERVICE);
mAccelerometer = mSensorManager.getDefaultSensor(Sensor.TYPE_ACCELEROMETER);
}
protected void onResume() {
super.onResume();
mSensorManager.registerListener(this, mAccelerometer, SensorManager.SENSOR_DELAY_NORMAL);
}
protected void onPause() {
super.onPause();
mSensorManager.unregisterListener(this);
}
public void onAccuracyChanged(Sensor sensor, int accuracy) {
}
public void onSensorChanged(SensorEvent event) {
}
}
There's a lot of work performed behind the scenes in order to implement the SensorManager.registerListener. First, SensorManager delegates the request to SystemSensorManager which is the real workhorse. I've copy-pasted the Lollipop code after removing some of the less-important, yet distracting code:
/** @hide */
@Override
protected boolean registerListenerImpl(SensorEventListener listener, Sensor sensor,
int delayUs, Handler handler, int maxBatchReportLatencyUs, int reservedFlags) {
// Invariants to preserve:
// - one Looper per SensorEventListener
// - one Looper per SensorEventQueue
// We map SensorEventListener to a SensorEventQueue, which holds the looper
synchronized (mSensorListeners) {
SensorEventQueue queue = mSensorListeners.get(listener);
if (queue == null) {
Looper looper = (handler != null) ? handler.getLooper() : mMainLooper;
queue = new SensorEventQueue(listener, looper, this);
if (!queue.addSensor(sensor, delayUs, maxBatchReportLatencyUs, reservedFlags)) {
queue.dispose();
return false;
}
mSensorListeners.put(listener, queue);
return true;
} else {
return queue.addSensor(sensor, delayUs, maxBatchReportLatencyUs, reservedFlags);
}
}
}
As you can see, a SensorEventQueue and Looper are created per registered SensorEventListener.
The SensorEventQueue is the object which eventually delivers sensor events to the application. This class diagram can give you some high-level grasp of the Java and native class hierarchy.
Because this blog entry is about BitTube and not about the Sensor subsystem, I'll jump over many details: eventually a native SensorEventQueue is created.
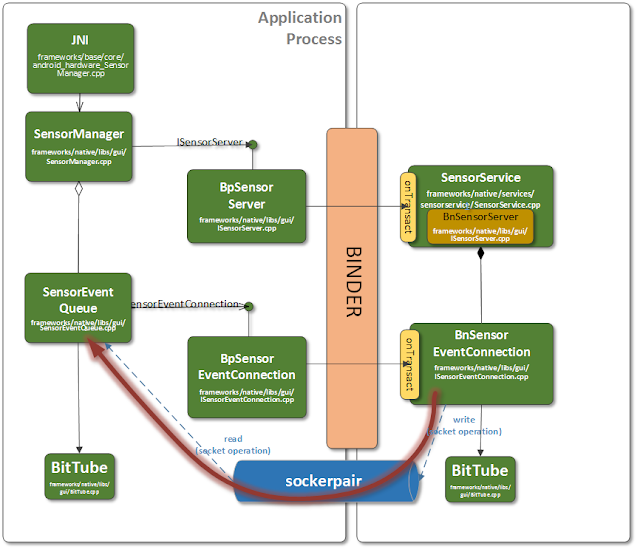
The native SensorEventQueue uses a SensorEventConnection to bridge the process address-space gap and communicate with the native SensorService. The BnSensorEventConnection (this is the server-side of the IPC) creates a BitTube and with it a socketpair. One of the socket handles is dup'ed ('dup' system call) by the BpSensorEventConnection and, voila: we have a communication pipe between the two processes, as depicted below.
As I mentioned above, the BitTube is used as a one-way pipe: events are written on one side and read by the SensorEventQueue, on the other side.
During the construction of the socketpair 2 x 4KB (default size) buffers are allocated by the kernel (one for the send-side buffer and the other for the receive-side buffer) using the SO_SNDBUF and SO_RCVBUF socket options. Remember that this is done per SensorEventListener. And there's also a Looper thread per SensorEventListener. Quite a lot of overhead.
So, the question still begs, what's gained by using this "new" IPC? At first I thought that this was some legacy design from the early days of Android, or perhaps from some module that was integrated some time ago into the code-base. But this wouldn't explain why BitTube is also used by DisplayEventReceiver for what looks like a similar setup.
Maybe it provides extra low latency? BitTube can deliver several events in one write/read, but that can also be done with Binder without introducing any complications. They both incur about the same number of context switches, buffer copies, and system calls.
Is simplicity the motivation? No, BitTube is about as complex as using Binder.
This leaves me with throughput as the only other reason I can think of. But sensors are defined as low bandwidth components:
Not included in the list of physical devices providing data are camera, fingerprint sensor, microphone, and touch screen. These devices have their own reporting mechanism; the separation is arbitrary, but in general, Android sensors provide lower bandwidth data. For example, “100hz x 3 channels” for an accelerometer versus “25hz x 8 MP x 3 channels” for a camera or “44kHz x 1 channel” for a microphone.
For me, the mystery remains. If you have some thoughts on this, please comment - I'd love to learn.
In any case, BitTube provides another tool in our AOSP tool chest - although I'm hesitant about using it, until I understand what extra powers it give me :-)

